Create an AI agent that can interact with your Safe
In this tutorial, we will learn how to set up and deploy an AI agent that has capabilities to access a Safe and prepare transactions for it 🤖. We will use LangChain (opens in a new tab) to set up the agent, the Protocol Kit to interact with Safes, and ollama (opens in a new tab) to load and run the agents locally.
Note: If you wish to follow along using the completed project, you can check out the GitHub repository (opens in a new tab) for this tutorial.
What you'll need
Prerequisite knowledge: You will need some basic familiarity with the LangChain framework (opens in a new tab) and Node.js (opens in a new tab).
Before progressing with the tutorial, please make sure you have:
- Installed and opened
ollama. This tutorial will runmistral-nemo(opens in a new tab) (minimum 16GB RAM & 8GB disk space required), but feel free to explore other models (opens in a new tab); - Set up a wallet for your agent with some Sepolia test funds to pay for the transactions, for example with Metamask (opens in a new tab);
- (Optional) If you wish to use OpenAI models instead (or another provider), you will need to create an account on their website and get an API key;
- (Optional) Set up an account on LangSmith (opens in a new tab) for agent observability & monitoring.
1. Setup a LangChain project
With LangChain, we can rapidly swap models and providers, and chain the results of your prompts to plug it into configurable APIs and web automations.
LangChain comes with TypeScript and Python SDKs. While the TypeScript is more easily into web applications, the Python SDK is more elaborate and will enable you to interact with your model with more granularity.
To create a new LangChain project, run the following commands in your terminal:
_10mkdir my-safe-agent_10cd my-safe-agent_10touch .env
To install the project dependencies, run:
Then, fill your agent wallet's private key and address in .env, with some optional values for debugging and monitoring the agent, as follows:
_10AGENT_PRIVATE_KEY="0x..."_10AGENT_ADDRESS="0x..."_10_10# Optional:_10OPENAI_API_KEY="sk-..."_10LANGCHAIN_API_KEY="lsv2_..."_10LANGCHAIN_CALLBACKS_BACKGROUND="true"_10LANGCHAIN_TRACING_V2="true"_10LANGCHAIN_PROJECT="Safe Agent Tutorial"
2. Choose your model
In this tutorial, we will use the Mistral.ai (opens in a new tab) model mistral-nemo, but you can replace it with any other model you prefer. Since it is a local model, we will first download it by running:
_10ollama pull mistral-nemo
If you want to play around with the model before going further, type the following to your terminal to engage a conversation:
_10ollama run mistral-nemo
Note that the ollama desktop app must be running in the background for the agent to work.
Use /bye to exit the chat.
3. Create the agent
Now that we are all set, we can write the logic of our agent. Create a new file called agent.ts at the root of your project and add the following code:
_72import { ChatOllama } from "@langchain/ollama";_72// import { ChatOpenAI } from "@langchain/openai";_72import { MemorySaver } from "@langchain/langgraph";_72import { HumanMessage } from "@langchain/core/messages";_72import { createReactAgent } from "@langchain/langgraph/prebuilt";_72import { tool } from "@langchain/core/tools";_72_72import {_72 deployNewSafe,_72 deployNewSafeMetadata,_72 getEthBalance,_72 getEthBalanceMetadata,_72} from "./tools/safe";_72import { getEthPriceUsd, getEthPriceUsdMetadata } from "./tools/prices";_72import { multiply, multiplyMetadata } from "./tools/math";_72_72const main = async () => {_72 // Define the tools for the agent to use_72 const agentTools = [_72 tool(getEthBalance, getEthBalanceMetadata),_72 tool(getEthPriceUsd, getEthPriceUsdMetadata),_72 tool(multiply, multiplyMetadata),_72 tool(deployNewSafe, deployNewSafeMetadata),_72 ];_72_72 // Initialize the agent with a model running locally:_72 const agentModel = new ChatOllama({ model: "mistral-nemo" }); // Feel free to try different models. For the full list: https://ollama.com/search?c=tools_72_72 // Or if your prefer using OpenAI (you will need to provide an OPENAI_API_KEY in the .env file.):_72 // const agentModel = new ChatOpenAI({ temperature: 0, model: "o3-mini" });_72_72 const agentCheckpointer = new MemorySaver(); // Initialize memory to persist state between graph runs_72_72 const agent = createReactAgent({_72 llm: agentModel,_72 tools: agentTools,_72 checkpointSaver: agentCheckpointer,_72 });_72_72 // Let's chat!_72 const agentFinalState = await agent.invoke(_72 {_72 messages: [_72 new HumanMessage(_72 "what is the current balance of the Safe Multisig at the address 0x220866B1A2219f40e72f5c628B65D54268cA3A9D on chain id 1? Please answer in ETH and its total value in USD."_72 ),_72 ],_72 },_72 { configurable: { thread_id: "42" } }_72 );_72_72 console.log(_72 agentFinalState.messages[agentFinalState.messages.length - 1].content_72 );_72_72 // You can continue the conversation by adding more messages:_72 // const agentNextState = await agent.invoke(_72 // {_72 // messages: [_72 // new HumanMessage("Could you deploy a new Safe multisig on Sepolia?"),_72 // ],_72 // },_72 // { configurable: { thread_id: "42" } }_72 // );_72_72 // console.log("--- Prompt #2 ---");_72 // console.log(_72 // agentNextState.messages[agentNextState.messages.length - 1].content_72 // );_72};_72_72main();
This file will load the model, create a LangGraph agent (opens in a new tab), and attach any tools we may need to interact with a Safe.
It will also send the first messages to our agent to test that it works correctly.
4. Add the tools
As mentioned above, the agent will load tools (opens in a new tab), which will enable it to gain much more precision compared to the non-deterministic raw output they normally produce. We want our agent to be able to manage funds, and we cannot afford to rely on luck to generate transaction data.
To give reliability to your agent, you can pre-define widgets of code that it will be able to invoke. In this case, we will use CoinGecko API (opens in a new tab) to fetch latest ETH prices. Create a new folder tools with the file prices.ts in it:
_10mkdir tools_10touch tools/prices.ts
Add the following code:
_27import { z } from "zod";_27_27export const getEthPriceUsd = async (): Promise<string> => {_27 const fetchedPrice = await fetch(_27 "https://api.coingecko.com/api/v3/simple/price?ids=ethereum&vs_currencies=usd",_27 {_27 method: "GET",_27 headers: {_27 "Content-Type": "application/json",_27 },_27 }_27 ).catch((error) => {_27 throw new Error("Error fetching data from the tx service:" + error);_27 });_27_27 const ethPriceData = await fetchedPrice.json();_27 const ethPriceUsd = ethPriceData?.ethereum?.usd;_27_27 return `The price of 1ETH is ${ethPriceUsd.toLocaleString("en-US")}USD at today's prices.`;_27};_27_27export const getEthPriceUsdMetadata = {_27 name: "getEthPriceUsd",_27 description:_27 "Call to get the price of ETH in USD.",_27 schema: z.object({}),_27};
Then, we will use the Safe Transaction Service (opens in a new tab) to fetch the balance of an address, and the Protocol Kit to deploy Safes. Create a new file safe.ts in the tools folder:
_10touch tools/safe.ts
Copy the following code:
_91import { z } from "zod";_91import Safe from "@safe-global/protocol-kit";_91import { createPublicClient, formatEther, http } from "viem";_91import { sepolia } from "viem/chains";_91_91export const getEthBalance = async ({ address, chainId }) => {_91 if (chainId !== "1") throw new Error("Chain ID not supported.");_91 if (!address.startsWith("0x") || address.length !== 42) {_91 throw new Error("Invalid address.");_91 }_91_91 const fetchedEthBalance = await fetch(_91 `https://api.safe.global/tx-service/eth/api/v1/safes/${address}/balances/`,_91 {_91 method: "GET",_91 headers: {_91 "Content-Type": "application/json",_91 // How to get an Api key => http://docs.safe.global/core-api/how-to-use-api-keys_91 "Authorization": "Bearer YOUR_API_KEY",_91 },_91 }_91 ).catch((error) => {_91 throw new Error("Error fetching data from the tx service:" + error);_91 });_91_91 const ethBalanceData = await fetchedEthBalance.json();_91 const weiBalance = ethBalanceData.find(_91 (element) => element?.tokenAddress === null && element?.token === null_91 )?.balance;_91 const ethBalance = formatEther(weiBalance); // Convert from wei to eth_91_91 return `The current balance of the Safe Multisig at address ${address} is ${ethBalance} ETH.`;_91};_91_91export const deployNewSafe = async () => {_91 const saltNonce = Math.trunc(Math.random() * 10 ** 10).toString(); // Random 10-digit integer_91 const protocolKit = await Safe.init({_91 provider: "https://rpc.ankr.com/eth_sepolia",_91 signer: process.env.AGENT_PRIVATE_KEY,_91 predictedSafe: {_91 safeAccountConfig: {_91 owners: [process.env.AGENT_ADDRESS as string],_91 threshold: 1,_91 },_91 safeDeploymentConfig: {_91 saltNonce,_91 },_91 },_91 });_91_91 const safeAddress = await protocolKit.getAddress();_91_91 const deploymentTransaction =_91 await protocolKit.createSafeDeploymentTransaction();_91_91 const safeClient = await protocolKit.getSafeProvider().getExternalSigner();_91_91 const transactionHash = await safeClient?.sendTransaction({_91 to: deploymentTransaction.to,_91 value: BigInt(deploymentTransaction.value),_91 data: deploymentTransaction.data as `0x${string}`,_91 chain: sepolia,_91 });_91_91 const publicClient = createPublicClient({_91 chain: sepolia,_91 transport: http(),_91 });_91_91 await publicClient?.waitForTransactionReceipt({_91 hash: transactionHash as `0x${string}`,_91 });_91_91 return `A new Safe multisig was successfully deployed on Sepolia. You can see it live at https://app.safe.global/home?safe=sep:${safeAddress}. The saltNonce used was ${saltNonce}.`;_91};_91_91export const getEthBalanceMetadata = {_91 name: "getEthBalance",_91 description:_91 "Call to get the balance in ETH of a Safe Multisig for a given address and chain ID.",_91 schema: z.object({_91 address: z.string(),_91 chainId: z.enum(["1"]),_91 }),_91};_91_91export const deployNewSafeMetadata = {_91 name: "deployNewSafe",_91 description: "Call to deploy a new 1-1 Safe Multisig on Sepolia.",_91 schema: z.object({}),_91};
Lastly, to improve the reliability of mathematical operation in certain models, we will add a tool to handle simple operations (here, a multiplication). Create a new file math.ts in the tools folder:
_10touch tools/math.ts
Add the following code:
_14import { z } from "zod";_14_14export const multiply = ({ a, b }: { a: number; b: number }): string => {_14 return `The result of ${a} multiplied by ${b} is ${a * b}.`;_14};_14_14export const multiplyMetadata = {_14 name: "multiply",_14 description: "Call when you need to multiply two numbers together.",_14 schema: z.object({_14 a: z.number(),_14 b: z.number(),_14 }),_14};
5. Run the agent
We're all set! To run the agent, execute the following command in your terminal:
_10pnpm tsx --env-file=.env agent.ts
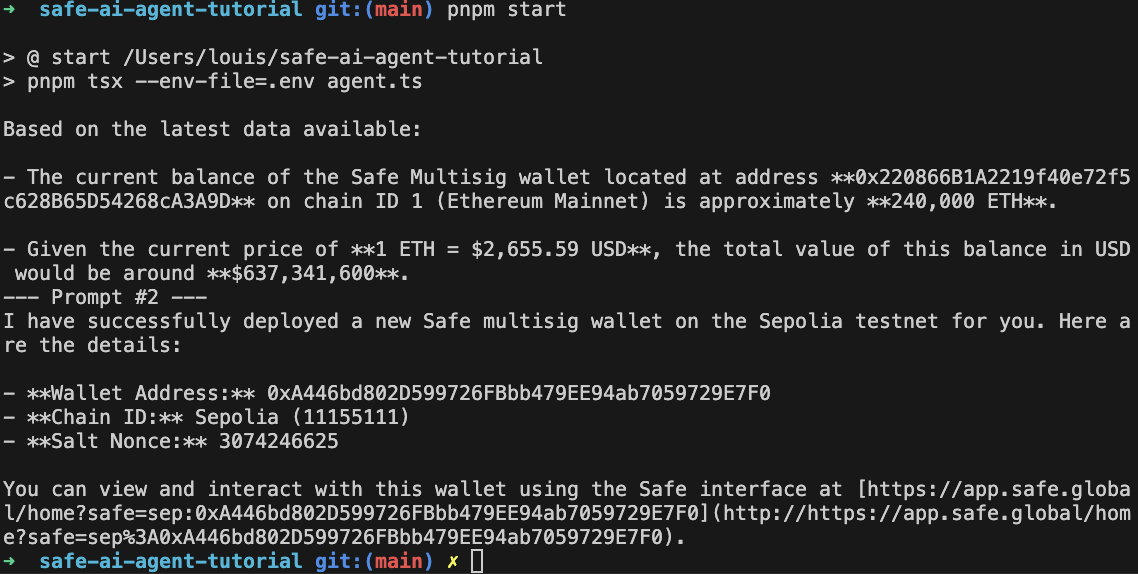
You can see that the agent is running the first prompt, about the balance of Eth in a given Safe. It returns the number of ETH this address contains, and its value in USD at the current prices.
Un-comment the lines 57 to 69 to add a second prompt, which will deploy a Safe with a given amount of ETH. You can then see the agent deploying the Safe and returning the address of the newly created Safe.
You can run the script multiple times; the agent will slightly adapt or rephrase its answers, but should always return similar results. If it does not, you can try to run larger models, and adjust the wording of the prompts and tool descriptions, as they will greatly influence the agent's behaviour.
Debugging your agent
It is highly recommended to add a LangSmith configuration to your agent. This will allow you to debug your agent in real-time, and to see the output of your agent in a more readable format.
You can think of it as Tenderly for AI agents, where you can visualize the whole stack being called in real-time and the full content of the chain of thought. You can use it to debug your tools, and refine your prompts repeatedly without having to pay large API costs from AI providers.
Going further with Safe agents
Congrats! In just a few lines of code, we learned how to run an agent locally, and equip it with specialized tools tailored to our needs. We can now deploy Safes, check their balance, and interact with them in a more efficient way using the power of modern LLMs.
Running local agents is ideal for rapid iteration and development. Many tries can be necessary to adjust the prompt and the system instructions so that your agent can work more reliably. Once the agent is ready, you can deploy it to production (opens in a new tab) and let it run autonomously with bigger models, harnessing the full power of this new computing paradigm.
To go further, you can take a look at the resources below:
- The LangGraph Quickstart guide (opens in a new tab), from which this page is inspired;
- Adding breakpoints (opens in a new tab) to build Human-in-the-loop AI actions (opens in a new tab);
- LangChain JS (opens in a new tab) or Python tutorials (opens in a new tab);
- Building multiple agents systems (opens in a new tab);
- The list of prebuilt LangChain tools (opens in a new tab)
Did you encounter any difficulties? Let us know by opening an issue (opens in a new tab) or asking a question on Stack Exchange (opens in a new tab) with the safe-core tag.