How to build a Vue app with Safe and passkeys
Because of known compatibility issues with Mozilla Firefox's implementation of passkeys, we recommend using Google Chrome or Chromium to follow this tutorial.
An increasing number of applications rely on passkeys to authenticate users securely and with little friction. Security and user-friendliness are crucial to making web3 a reality for the next billion users. Being able to unlock a Safe Smart Account with your fingerprints or Face ID, sending transactions without worrying about third-party wallet interfaces, phishing attempts, or securing seed phrases will bring new forms of ownership to the connected world. Today, we'll learn how to make this a reality using Safe{Core} SDK, Pimlico (opens in a new tab), and Nuxt (opens in a new tab).
This tutorial will demonstrate creating a web app for using passkeys in your Safe. This app will allow you to:
- Create a new passkey secured by the user's device.
- Deploy a new Safe on Ethereum Sepolia for free.
- Sign a transaction to mint an NFT using the previously created passkey.
What you'll need
Prerequisite knowledge: You will need some basic experience with Vue (opens in a new tab), Nuxt, and ERC-4337.
Before progressing with the tutorial, please make sure you have:
- Downloaded and installed Node.js (opens in a new tab) and pnpm (opens in a new tab).
- Created an API key from Pimlico (opens in a new tab).
Note: If you wish to follow along using the completed project, you can check out the GitHub repository (opens in a new tab) for this tutorial.
1. Setup a Nuxt application
Initialize a new Nuxt app using pnpm with the following command:
_10pnpm dlx nuxi@latest init safe-passkeys-nuxt -t ui
When prompted by the CLI, select pnpm and yes to initialize a Git repository.
Install dependencies
For this project, we'll use the Relay Kit and Protocol Kit from the Safe{Core} SDK to set up a Safe, sponsor a transaction, and use viem (opens in a new tab) for a helper function to encode the dummy transaction. We will also use @pinia/nuxt (opens in a new tab) for state management and node polyfills from Vite (opens in a new tab).
Run the following command to add all these dependencies to the project:
_10pnpm add @safe-global/protocol-kit@4.1.0 @safe-global/relay-kit@3.1.0 viem @pinia/nuxt vite-plugin-node-polyfills
Replace the content of nuxt.config.ts with the following code:
_16// https://nuxt.com/docs/api/configuration/nuxt-config_16import { nodePolyfills } from 'vite-plugin-node-polyfills'_16_16export default defineNuxtConfig({_16 compatibilityDate: '2024-04-03',_16 devtools: { enabled: true },_16 modules: ['@nuxt/ui', '@pinia/nuxt'],_16 vite: {_16 plugins: [nodePolyfills()]_16 },_16 runtimeConfig: {_16 public: {_16 NUXT_PUBLIC_PIMLICO_API_KEY: process.env.NUXT_PUBLIC_PIMLICO_API_KEY_16 }_16 }_16})
Now, create a file named .env at the root of your project, and add your Pimlico API key to it:
_10echo "NUXT_PUBLIC_PIMLICO_API_KEY='your_pimlico_api_key_goes_here'" > .env
Run the development server
Run the local development server with the following command:
_10pnpm dev
Go to http://localhost:3000 in your browser to see the default Nuxt application.
2. Add project constants and utilities
Create a utils folder at the project root and add a file constants.ts containing common constants used throughout the project:
_10mkdir utils_10cd utils_10touch constants.ts
Add the following code to the constants.ts file:
_10export const STORAGE_PASSKEY_LIST_KEY = 'safe_passkey_list'_10export const RPC_URL = 'https://ethereum-sepolia-rpc.publicnode.com'_10export const CHAIN_NAME = 'sepolia'_10export const PAYMASTER_ADDRESS = '0x0000000000325602a77416A16136FDafd04b299f' // SEPOLIA_10export const BUNDLER_URL = `https://api.pimlico.io/v1/${CHAIN_NAME}/rpc?add_balance_override&apikey=`_10export const PAYMASTER_URL = `https://api.pimlico.io/v2/${CHAIN_NAME}/rpc?add_balance_override&apikey=`_10export const NFT_ADDRESS = '0xBb9ebb7b8Ee75CDBf64e5cE124731A89c2BC4A07'
3. Add passkeys functionality
In the utils folder, create a file called passkeys.ts:
_10touch passkeys.ts
This file will contain all the logic required to operate passkey:
- Create and recover them using the user's device.
- Store and retrieve them from/to the local storage.
Note: You can also store the passkeys on a remote database or the user's device.
_82import {_82 type PasskeyArgType,_82 extractPasskeyData_82} from '@safe-global/protocol-kit'_82_82/**_82 * Create a passkey using WebAuthn API._82 * @returns {Promise<PasskeyArgType>} Passkey object with rawId and coordinates._82 * @throws {Error} If passkey creation fails._82 */_82export async function createPasskey(): Promise<PasskeyArgType> {_82 const displayName = 'Safe Owner' // This can be customized to match, for example, a user name._82 // Generate a passkey credential using WebAuthn API_82 const passkeyCredential = await navigator.credentials.create({_82 publicKey: {_82 pubKeyCredParams: [_82 {_82 // ECDSA w/ SHA-256: https://datatracker.ietf.org/doc/html/rfc8152#section-8.1_82 alg: -7,_82 type: 'public-key'_82 }_82 ],_82 challenge: crypto.getRandomValues(new Uint8Array(32)),_82 rp: {_82 name: 'Safe SmartAccount'_82 },_82 user: {_82 displayName,_82 id: crypto.getRandomValues(new Uint8Array(32)),_82 name: displayName_82 },_82 timeout: 60_000,_82 attestation: 'none'_82 }_82 })_82_82 if (!passkeyCredential) {_82 throw Error('Passkey creation failed: No credential was returned.')_82 }_82_82 const passkey = await extractPasskeyData(passkeyCredential)_82 console.log('Created Passkey: ', passkey)_82_82 return passkey_82}_82_82/**_82 * Store passkey in local storage._82 * @param {PasskeyArgType} passkey - Passkey object with rawId and coordinates._82 */_82export function storePasskeyInLocalStorage(passkey: PasskeyArgType) {_82 const passkeys = loadPasskeysFromLocalStorage()_82_82 passkeys.push(passkey)_82_82 localStorage.setItem(STORAGE_PASSKEY_LIST_KEY, JSON.stringify(passkeys))_82}_82_82/**_82 * Load passkeys from local storage._82 * @returns {PasskeyArgType[]} List of passkeys._82 */_82export function loadPasskeysFromLocalStorage(): PasskeyArgType[] {_82 const passkeysStored = localStorage.getItem(STORAGE_PASSKEY_LIST_KEY)_82_82 const passkeyIds = passkeysStored ? JSON.parse(passkeysStored) : []_82_82 return passkeyIds_82}_82_82/**_82 * Get passkey object from local storage._82 * @param {string} passkeyRawId - Raw ID of the passkey._82 * @returns {PasskeyArgType} Passkey object._82 */_82export function getPasskeyFromRawId(passkeyRawId: string): PasskeyArgType {_82 const passkeys = loadPasskeysFromLocalStorage()_82_82 const passkey = passkeys.find((passkey) => passkey.rawId === passkeyRawId)!_82_82 return passkey_82}
In this file, we have four functions:
createPasskey, which helps create a new passkey.storePasskeyInLocalStorage, which helps store it in the browser's local storage.loadPasskeysFromLocalStorage, which helps load a passkey from local storage.getPublicKeyFromLocalStorage, which helps find a passkey in the local storage corresponding to a givenrawIdand returns this passkey's public key.getPasskeyFromRawId, which helps reconstruct a full passkey from arawIdand a public key stored in local storage.
4. Add mint NFT functionality
Create a mintNFT.ts file in the utils folder to add functions to prepare and send a transaction minting an NFT from our yet-to-come Safe.
_10touch mintNFT.ts
Add the following code to the mintNFT.ts file:
_116import type { PasskeyArgType } from '@safe-global/protocol-kit'_116import { Safe4337Pack } from '@safe-global/relay-kit'_116import { encodeFunctionData } from 'viem'_116_116/**_116 * Mint an NFT._116 * @param {PasskeyArgType} signer - Signer object with rawId and coordinates._116 * @param {string} safeAddress - Safe address._116 * @returns {Promise<void>}_116 * @throws {Error} If the operation fails._116 */_116export const mintNFT = async (passkey: PasskeyArgType, safeAddress: string) => {_116 const runtimeConfig = useRuntimeConfig()_116_116 // 1) Initialize Safe4337Pack_116 const paymasterOptions = {_116 isSponsored: true,_116 paymasterAddress: PAYMASTER_ADDRESS,_116 paymasterUrl:_116 PAYMASTER_URL + runtimeConfig.public.NUXT_PUBLIC_PIMLICO_API_KEY_116 }_116_116 const safe4337Pack = await Safe4337Pack.init({_116 provider: RPC_URL,_116 signer: passkey,_116 bundlerUrl: BUNDLER_URL + runtimeConfig.public.NUXT_PUBLIC_PIMLICO_API_KEY,_116 paymasterOptions,_116 options: {_116 owners: [_116 /* Other owners... */_116 ],_116 threshold: 1_116 }_116 })_116_116 // 2) Create SafeOperation_116 const mintNFTTransaction = {_116 to: NFT_ADDRESS,_116 data: encodeSafeMintData(safeAddress),_116 value: '0'_116 }_116_116 const safeOperation = await safe4337Pack.createTransaction({_116 transactions: [mintNFTTransaction]_116 })_116_116 // 3) Sign SafeOperation_116 const signedSafeOperation =_116 await safe4337Pack.signSafeOperation(safeOperation)_116_116 console.log('SafeOperation', signedSafeOperation)_116_116 // 4) Execute SafeOperation_116 const userOperationHash = await safe4337Pack.executeTransaction({_116 executable: signedSafeOperation_116 })_116_116 return userOperationHash_116}_116_116/**_116 * Encodes the data for a safe mint operation._116 * @param to The address to mint the token to._116 * @param tokenId The ID of the token to mint._116 * @returns The encoded data for the safe mint operation._116 */_116export function encodeSafeMintData(_116 to: string,_116 tokenId: bigint = getRandomUint256()_116): string {_116 return encodeFunctionData({_116 abi: [_116 {_116 constant: false,_116 inputs: [_116 {_116 name: 'to',_116 type: 'address'_116 },_116 {_116 name: 'tokenId',_116 type: 'uint256'_116 }_116 ],_116 name: 'safeMint',_116 payable: false,_116 stateMutability: 'nonpayable',_116 type: 'function'_116 }_116 ],_116 functionName: 'safeMint',_116 args: [to, tokenId]_116 })_116}_116_116/**_116 * Generates a random 256-bit unsigned integer._116 *_116 * @returns {bigint} A random 256-bit unsigned integer._116 *_116 * This function uses the Web Crypto API's `crypto.getRandomValues()` method to generate_116 * a uniformly distributed random value within the range of 256-bit unsigned integers_116 * (from 0 to 2^256 - 1)._116 */_116function getRandomUint256(): bigint {_116 const dest = new Uint8Array(32) // Create a typed array capable of storing 32 bytes or 256 bits_116_116 crypto.getRandomValues(dest) // Fill the typed array with cryptographically secure random values_116_116 let result = 0n_116 for (let i = 0; i < dest.length; i++) {_116 result |= BigInt(dest[i]) << BigInt(8 * i) // Combine individual bytes into one bigint_116 }_116_116 return result_116}
With this configuration, a new Safe will be created (but not yet deployed) when a passkey is selected. This Safe will be deployed when its first transaction is executed.
Note: Minting an NFT was chosen here just as an example, and any other transaction would have the same effect.
5. Add a state store
We will use Pinia to manage the state of our app. Pinia allows to gracefully handle state changes across wider applications, which is why we'll be using it for this tutorial.
Create a stores folder at the project root and add a file safe.ts:
_10cd .._10mkdir stores_10cd stores_10touch safe.ts
Add the following code to the safe.ts file:
_40import type { PasskeyArgType } from '@safe-global/protocol-kit'_40_40export const useSafeStore = defineStore('safe', {_40 state: () => ({_40 passkeys: <PasskeyArgType[]>[],_40 selectedPasskey: <PasskeyArgType>{},_40 safeAddress: <string>'',_40 isSafeDeployed: <boolean>false,_40 isLoading: <boolean>false,_40 userOp: <string>'',_40 jiffyLink: <string>'',_40 safeLink: <string>''_40 }),_40 actions: {_40 setPasskeys(data: PasskeyArgType[]) {_40 this.passkeys = data_40 },_40 setSelectedPasskey(data: PasskeyArgType) {_40 this.selectedPasskey = data_40 },_40 setSafeAddress(data: string) {_40 this.safeAddress = data_40 },_40 setIsSafeDeployed(data: boolean) {_40 this.isSafeDeployed = data_40 },_40 setIsLoading(data: boolean) {_40 this.isLoading = data_40 },_40 setUserOp(data: string) {_40 this.userOp = data_40 },_40 setSafeLink(data: string) {_40 this.safeLink = data_40 },_40 setJiffyLink(data: string) {_40 this.jiffyLink = data_40 }_40 }_40})
6. Add UI components
Let's add a user interface to create and store a passkey on the user's device, deploy a safe, and sign the NFT transaction.
Create a components folder at the project root, and create a file named LoginWithPasskey.vue:
_10mkdir ../components_10cd ../components_10touch LoginWithPasskey.vue
Add the following code to the LoginWithPasskey.vue file:
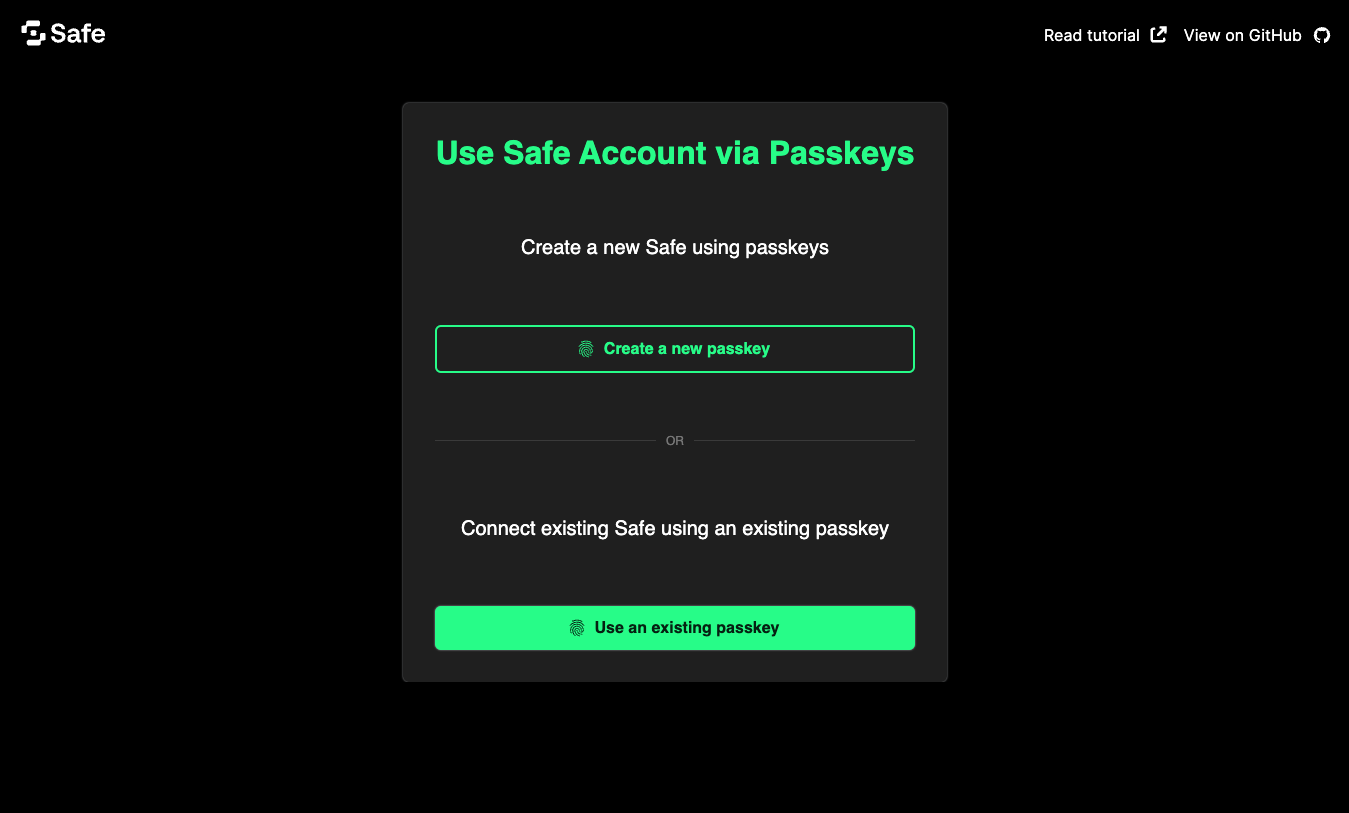
_70<script setup lang="ts">_70import { useSafeStore } from '@/stores/safe'_70import { Safe4337Pack } from '@safe-global/relay-kit'_70_70import type { PasskeyArgType } from '@safe-global/protocol-kit'_70_70const store = useSafeStore()_70const runtimeConfig = useRuntimeConfig()_70_70async function handleCreatePasskey() {_70 const passkey = await createPasskey()_70_70 storePasskeyInLocalStorage(passkey)_70 store.setSelectedPasskey(passkey)_70_70 await showSafeInfo(passkey)_70}_70_70async function selectExistingPasskey() {_70 const passkeys = loadPasskeysFromLocalStorage()_70_70 store.setPasskeys(passkeys)_70 store.setSelectedPasskey(passkeys[0])_70_70 await showSafeInfo(store.selectedPasskey)_70}_70_70async function showSafeInfo(passkey: PasskeyArgType) {_70 store.setIsLoading(true)_70 const safe4337Pack = await Safe4337Pack.init({_70 provider: RPC_URL,_70 signer: passkey,_70 bundlerUrl: BUNDLER_URL + runtimeConfig.public.NUXT_PUBLIC_PIMLICO_API_KEY,_70 options: {_70 owners: [],_70 threshold: 1_70 }_70 })_70 store.setSafeAddress(await safe4337Pack.protocolKit.getAddress())_70 store.setIsSafeDeployed(await safe4337Pack.protocolKit.isSafeDeployed())_70 store.setIsLoading(false)_70}_70</script>_70_70<template>_70 <div_70 v-if="Object.keys(store.selectedPasskey).length === 0"_70 class="mt-20 dark:bg-stone-800 bg-stone-50 p-8 rounded w-fit flex flex-col items-center"_70 >_70 <h1 class="text-4xl text-[#12FF80]">Use Safe Account via Passkeys</h1>_70 <h2 class="my-12">Create a new Safe using Passkeys</h2>_70 <UButton_70 icon="material-symbols:fingerprint"_70 block_70 class="mb-8"_70 variant="outline"_70 @click="handleCreatePasskey"_70 >_70 Create a new passkey_70 </UButton>_70 <UDivider label="OR" :ui="{ border: { base: 'dark:border-gray-500' } }" />_70 <h2 class="my-12">Connect existing Safe using an existing passkey</h2>_70 <UButton_70 icon="material-symbols:fingerprint"_70 block_70 @click="selectExistingPasskey"_70 >Use an existing passkey</UButton_70 >_70 </div>_70</template>
This component is an authentication modal allowing users to either signing in by creating a new passkey, or logging in with an existing one.
Next, create a SafeAccountDetails.vue file in the same folder:
_10touch SafeAccountDetails.vue
Add the following code to the SafeAccountDetails.vue file:
_92<script setup lang="ts">_92import { useSafeStore } from '@/stores/safe'_92_92const store = useSafeStore()_92_92async function handleMintNFT() {_92 store.setIsLoading(true)_92_92 const userOp = await mintNFT(store.selectedPasskey, store.safeAddress!)_92_92 store.setIsLoading(false)_92 store.setIsSafeDeployed(true)_92 store.setUserOp(userOp)_92 store.setJiffyLink(_92 `https://jiffyscan.xyz/userOpHash/${userOp}?network=${CHAIN_NAME}`_92 )_92 store.setSafeLink(_92 `https://app.safe.global/home?safe=sep:${store.safeAddress}`_92 )_92}_92_92const DEFAULT_CHAR_DISPLAYED = 6_92_92function splitAddress(_92 address: string,_92 charDisplayed: number = DEFAULT_CHAR_DISPLAYED_92): string {_92 const firstPart = address.slice(0, charDisplayed)_92 const lastPart = address.slice(address.length - charDisplayed)_92_92 return `${firstPart}...${lastPart}`_92}_92</script>_92_92<template>_92 <div_92 v-if="Object.keys(store.selectedPasskey).length !== 0"_92 class="mt-20 dark:bg-stone-800 bg-stone-50 p-8 rounded w-fit flex flex-col items-center"_92 >_92 <h1 class="text-4xl text-[#12FF80]">Your Safe Accout</h1>_92 <UIcon_92 v-if="store.isLoading"_92 name="line-md:loading-loop"_92 class="mt-4 w-12 h-12"_92 />_92 <div v-if="!store.isLoading" class="flex flex-col items-center">_92 <UButton_92 variant="link"_92 color="white"_92 v-if="store.safeAddress"_92 class="my-8"_92 :to="store.safeLink"_92 target="_blank"_92 rel="noopener noreferrer"_92 >_92 <template #leading_92 ><UIcon name="token:safe" class="h-8 w-8" /> </template_92 >{{ splitAddress(store.safeAddress) }}_92 <template #trailing_92 ><UIcon name="tabler:external-link" class="w-5 h-5" />_92 </template>_92 </UButton>_92 <UBadge_92 v-if="store.safeAddress && !store.isSafeDeployed"_92 color="yellow"_92 variant="solid"_92 >Deployment pending_92 </UBadge>_92 <UButton_92 variant="outline"_92 v-if="store.safeAddress"_92 icon="material-symbols:image-outline"_92 class="mt-8 ml-2 mr-2"_92 @click="handleMintNFT"_92 >_92 Mint NFT</UButton_92 >_92 <UButton_92 variant="link"_92 color="white"_92 v-if="store.userOp"_92 class="my-8"_92 :to="store.jiffyLink"_92 target="_blank"_92 rel="noopener noreferrer"_92 >{{ store.userOp }}_92 <template #trailing>_92 <UIcon name="tabler:external-link" class="w-5 h-5" /> </template_92 ></UButton>_92 </div>_92 </div>_92</template>
This component displays the details of the Safe account, including the Safe address, whether it is deployed, and a button to mint the NFT.
Lastly, replace the content of the app.vue file at the project root with this code:
_10<template>_10 <NuxtRouteAnnouncer />_10 <NuxtLayout name="default">_10 <LoginWithPasskey />_10 <SafeAccountDetails />_10 </NuxtLayout>_10</template>
This UI will put everything we built in the previous steps into a coherent application with all the functionality required to let you create a passkey, select it, and use it to sign a transaction.
7. Add styling
Because a web app is nothing without good styling, let's add some Safe design to our project 💅.
Create a layouts folder, and inside it create a new file default.vue:
_10mkdir ../layouts_10cd ../layouts_10touch default.vue
Add this code to the default.vue file:
_45<template>_45 <div class="p-6">_45 <header>_45 <div class="flex items-center justify-between">_45 <div class="flex items-center">_45 <UIcon name="SafeIcon" class="dark:white black h-9 w-24" />_45 </div>_45 <div class="flex items-center">_45 <UButton_45 label="Button"_45 variant="link"_45 color="white"_45 to="https://docs.safe.global/home/passkeys-tutorials/safe-passkeys-nuxt"_45 target="_blank"_45 rel="noopener noreferrer"_45 >_45 Read tutorial_45 <template #trailing>_45 <UIcon_45 name="tabler:external-link"_45 class="dark:white black h-6 w-6"_45 />_45 </template>_45 </UButton>_45 <UButton_45 label="Button"_45 variant="link"_45 color="white"_45 to="https://github.com/5afe/safe-passkeys-nuxt"_45 target="_blank"_45 rel="noopener noreferrer"_45 >_45 View on GitHub_45 <template #trailing>_45 <UIcon name="uil:github" class="dark:white black h-6 w-6" />_45 </template>_45 </UButton>_45 </div>_45 </div>_45 </header>_45 <main class="flex justify-center">_45 <slot />_45 </main>_45 </div>_45</template>
Testing your Safe passkeys app
That's it! You can find the source code for the example created in this tutorial on GitHub (opens in a new tab). You can now return to your browser and see the app displayed 🎉.
Click the Create a new passkey button to prompt a browser pop-up asking you to confirm the creation of a new passkey. This passkey will be stored in your browser's local storage and displayed in the list above the button.
This will create a new Safe object in the background, which will be deployed when you click the Mint NFT button. This will also mint an NFT using the passkey you created.
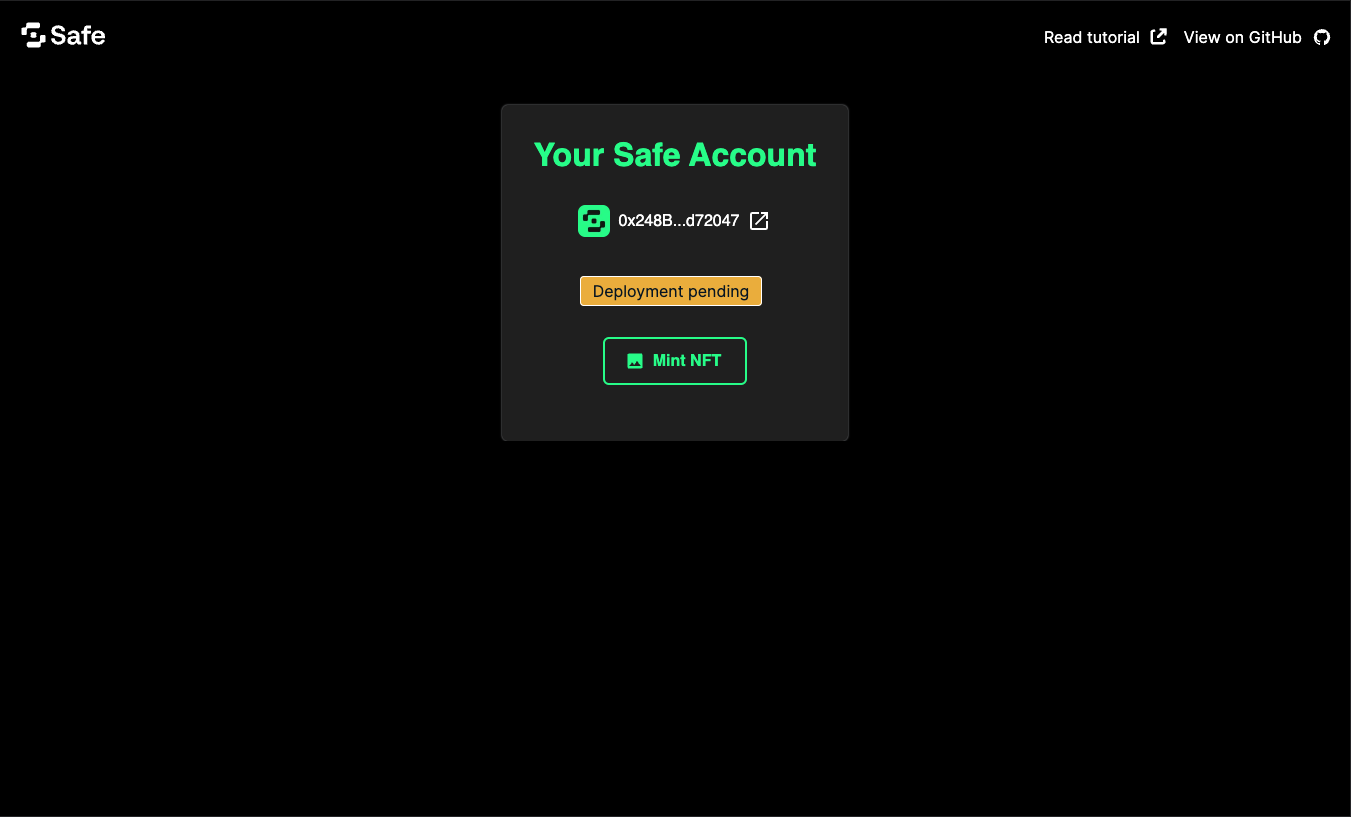
Click the link to Jiffy Scan to see the UserOp that was sent and more complete information.
Best practices
Please be mindful of certain security considerations when dealing with passkeys. For the tutorial's simplicity, we created a 1/1 Safe with a passkey as the sole signer. This is not recommended for production setups, as passkeys are tied to a domain name, and they can also be tied to hardware manufacturers. For that reason, they might become inaccessible if not configured or saved properly.
Note: Please always use a combination of passkeys and other authentication methods to ensure the security of your users' assets.
Do more with Safe and passkeys
We learned how to use passkeys (create them, store them, and use them securely) and how they can interact with a Safe (deploy it and send transactions). We hope you enjoyed this tutorial and that the combination of passkeys and the ERC-4337 will unlock new forms of ownership for your project and users.
You can now integrate passkeys with more transactions and functionalities of the Safe ecosystem. You can read more about passkeys in our overview or in the WebAuthn API documentation (opens in a new tab).
Did you encounter any difficulties? Let us know by opening an issue (opens in a new tab) or asking a question on Stack Exchange (opens in a new tab) with the safe-core tag.