How to build a React Native app with Safe and passkeys
An increasing number of applications rely on passkeys to authenticate users securely and with little friction. Security and user-friendliness are crucial to making web3 a reality for the next billion users. Being able to unlock a Safe Smart Account with your fingerprints or Face ID, sending transactions without worrying about third-party wallet interfaces, phishing attempts, or securing seed phrases will bring new forms of ownership to the connected world. Today, we'll learn how to use passkeys with React Native (opens in a new tab) and Expo (opens in a new tab).
This tutorial will show you how to create a React Native app for using passkeys in your Safe. This app will enable you to:
- Deploy a new Safe on Ethereum Sepolia.
- Create a new passkey secured by the user's device.
- Sign messages and create transactions using the passkey as a signer.
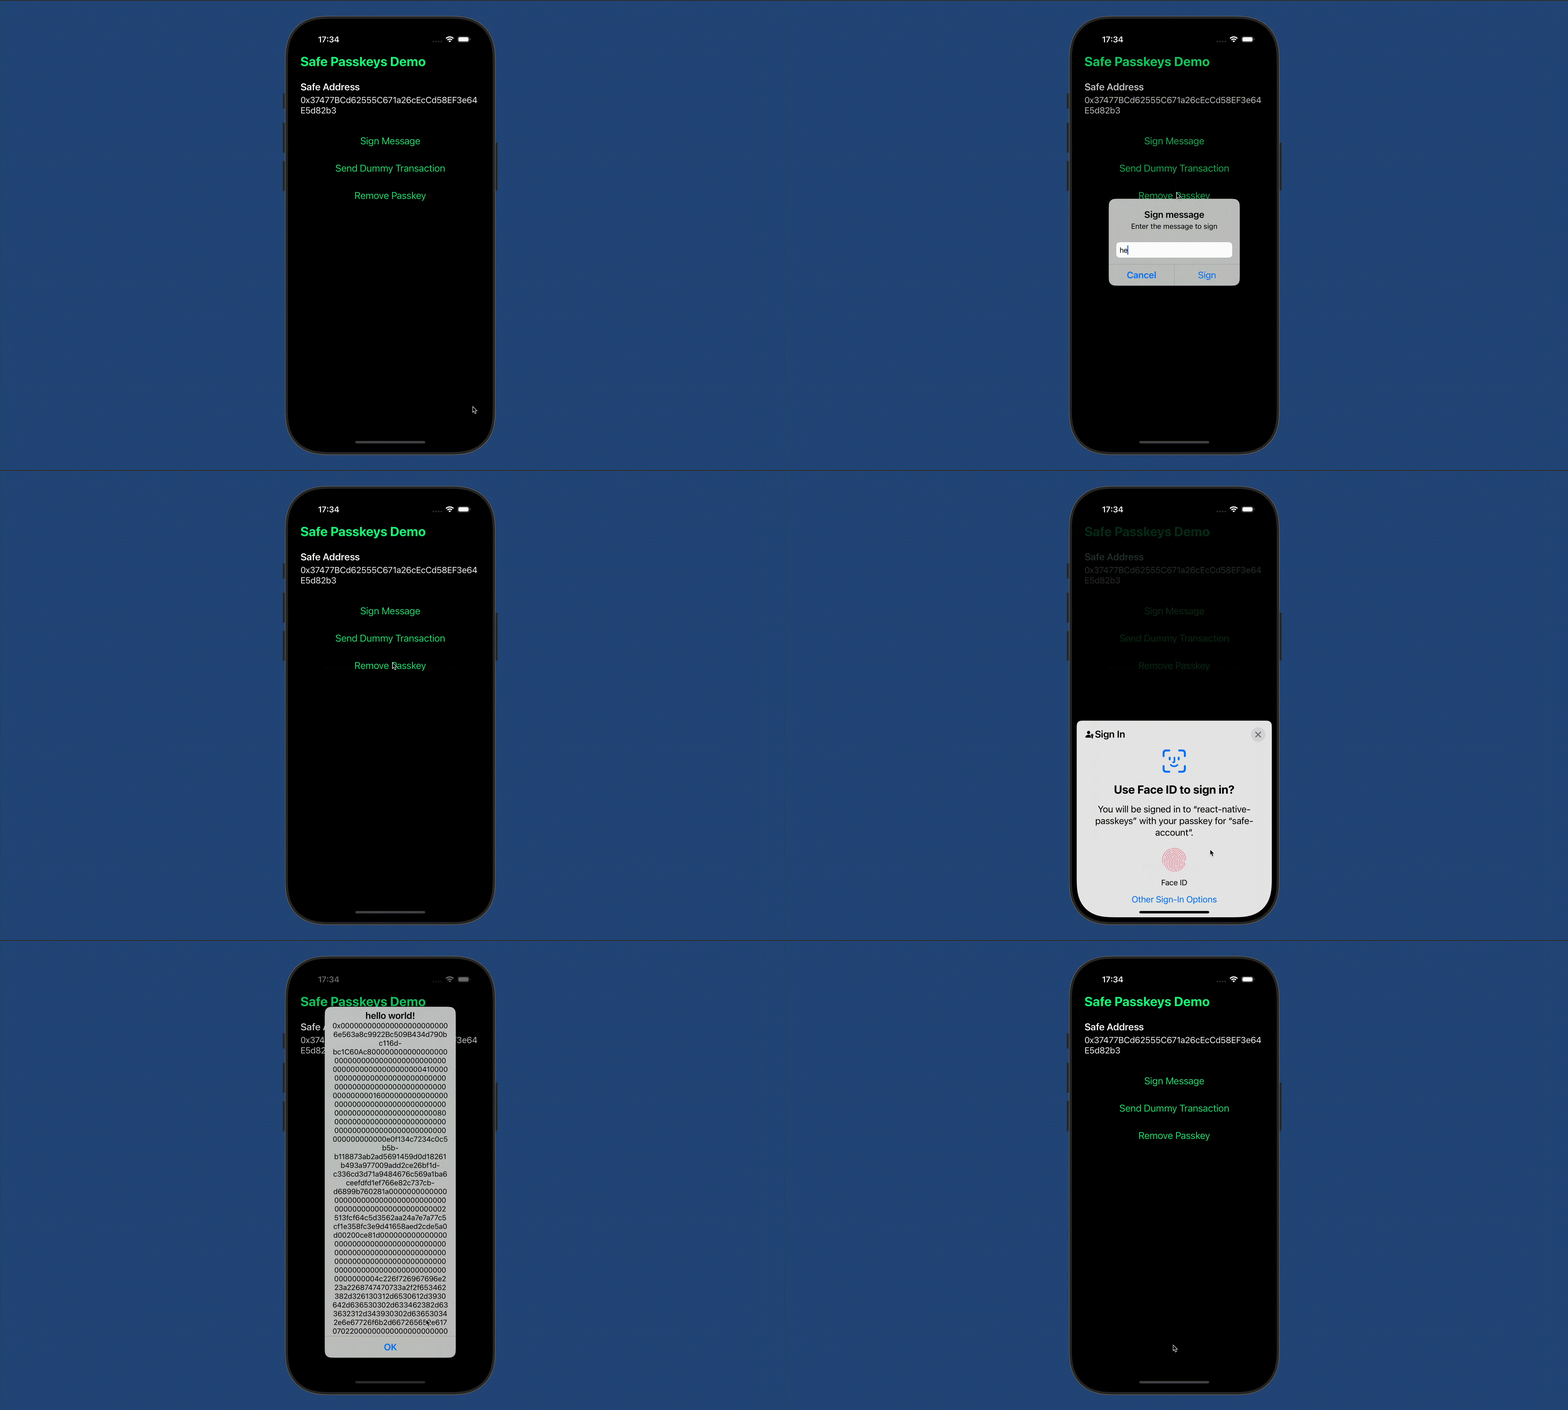
This is how the final app will look:

What you'll need
Prerequisite knowledge: You will need some basic experience with React (opens in a new tab), React Native (opens in a new tab) and Expo (opens in a new tab).
Before progressing with the tutorial, please make sure you have:
- Downloaded and installed Node.js (opens in a new tab).
- Have enrolled to the Apple Developer Program (opens in a new tab) and installed Xcode (opens in a new tab) (if you want to test the app on iOS)
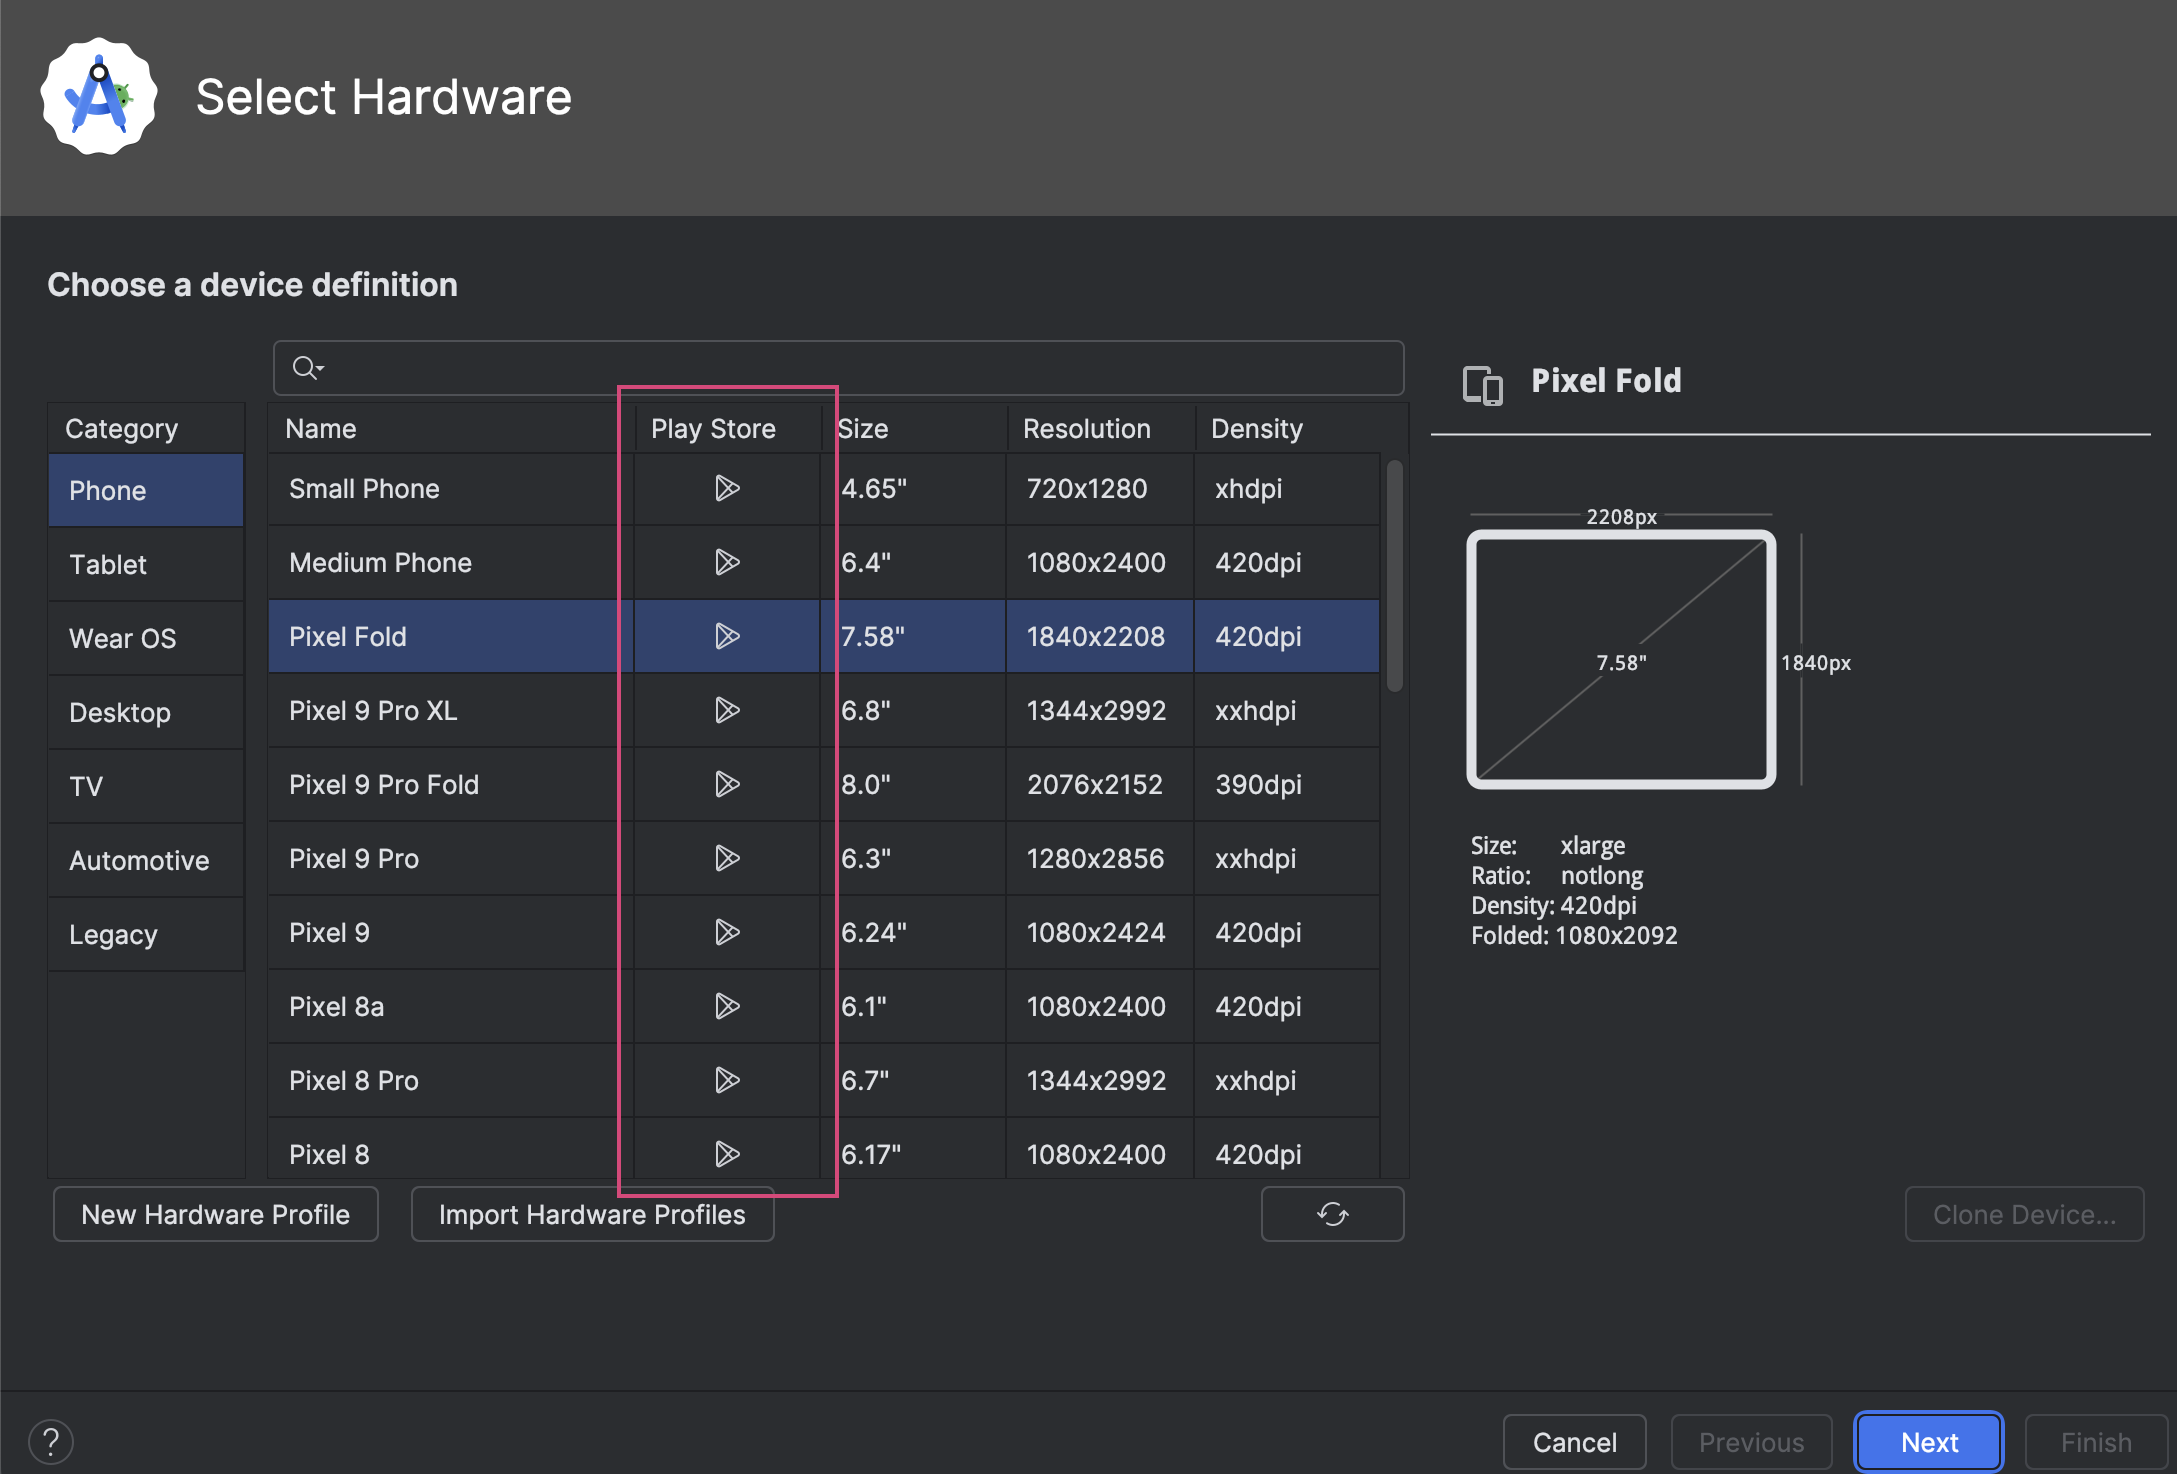
- Have downloaded and installed Android Studio (opens in a new tab) and have a Google account connected to your emulator (if you want to test the app on Android)
- Have a ngrok (opens in a new tab) account to create an HTTPS tunnel to your server.
Note: If you wish to follow along using the completed project, you can check out the GitHub repository (opens in a new tab) for this tutorial.
1. Setup a React Native app using Expo
Initialize a new project
Initialize a new React Native project using Expo by running the following command in your terminal:
_10npx create-expo-app@latest --template blank-typescript
When prompted by the CLI, enter the name of the application (for example, react-native-passkeys).
Install dependencies
Run the following command to add the project dependencies:
_10cd react-native-passkeys_10npm install @safe-global/protocol-kit react-native-passkeys react-native-base64 @react-native-async-storage/async-storage react-native-prompt-android expo-build-properties
We are using:
| Package | Description |
|---|---|
@safe-global/protocol-kit (opens in a new tab) | Protocol Kit package from the Safe{Core} SDK to set up a new Safe account, sign and send transactions. |
react-native-passkeys (opens in a new tab) | Expo module for creating and authenticating passkeys on iOS, Android, and the web using the same API. |
react-native-base64 (opens in a new tab) | Base64 encoding and decoding helping utilities. |
@react-native-async-storage/async-storage (opens in a new tab) | An asynchronous, unencrypted, persistent key-value storage system for React Native. We'll use local storage in the web and this AsyncStorage on the apps to store the passkey rawId and coordinates |
react-native-prompt-android (opens in a new tab) | This package allows you to use Prompt Dialog across platforms, including iOS (Alert.prompt) and Android (Dialog). |
expo-build-properties (opens in a new tab) | A plugin (opens in a new tab) to configure the native build properties in your android/gradle.properties and ios/Podfile.properties.json directories during Prebuild (opens in a new tab). |
Configure your development environment to use React Native and Expo
You need to configure your environment. If you are a React Native developer, you may have already set everything up. However, if you are new to React Native, you should prepare your environment. The best option is to follow the official Expo documentation (opens in a new tab).
We will use emulators and development builds in this tutorial, so please refer to the relevant sections in the Expo documentation for proper configuration. If you know how to do that or want to use a physical device, you can skip these steps. If you only want to test one platform, that's fine too, you only need to follow one of the steps below:
When creating the emulator (opens in a new tab) using Android Studio Device Manager, ensure that you include one with Play Store services, as this is required for passkeys. The version 17 of the Java Development Kit (JDK) is used to compile the project, make sure that you are using the correct version (opens in a new tab) before running the emulator.

Add environment variables
Create a file named .env in the root of your project and add the following keys:
_10// from ../../../../examples/react-native-passkeys/.env-sample
Replace add_private_key_here by a private key you own, and 0xOwnerAddress1 by one or more public addresses you own. These addresses will be used to deploy the Safe and add passkey owners.
Run emulators
After completing all these configurations 🙃, you can finally run the local development build of the app on the emulators (Emulators should be running) by using the following commands:
_10npx expo run:android_10npx expo run:ios
You can now begin developing the app.

2. Add project lib folder
Create a lib folder at the project root. This is the folder where we will include the logic to store and retrieve the passkey:
_10mkdir lib_10cd lib
3. Add storage functionality
Create a storage.ts file inside the lib folder:
_10touch storage.ts
Add the following code to the storage.ts file:
_37import { Platform } from "react-native";_37import AsyncStorage from "@react-native-async-storage/async-storage";_37import { PasskeyArgType } from "@safe-global/protocol-kit";_37_37const isWeb = Platform.OS === "web";_37_37// This function stores the passkey in the local storage of the device. _37export async function storePassKey(passkey: PasskeyArgType, label: string) {_37 const serializedPasskey = JSON.stringify(passkey);_37_37 if (isWeb) {_37 localStorage.setItem(label, serializedPasskey);_37 } else {_37 await AsyncStorage.setItem(label, serializedPasskey);_37 }_37}_37_37// This function retrieves the passkey from the local storage of the device._37export async function getStoredPassKey(label: string) {_37 if (isWeb) {_37 const passkey = localStorage.getItem(label);_37 return passkey ? JSON.parse(passkey) : undefined;_37 } else {_37 const passkey = await AsyncStorage.getItem(label);_37_37 return passkey ? JSON.parse(passkey) : undefined;_37 }_37}_37_37// This function removes the passkey from the local storage of the device._37export async function removeStoredPassKey(label: string) {_37 if (isWeb) {_37 localStorage.removeItem(label);_37 } else {_37 await AsyncStorage.removeItem(label);_37 }_37}
This file will contain all the logic to store the passkey in the device storage or in the web local storage depending on the platform.
4. Add passkeys functionality
Create a passkeys.ts file inside the lib folder:
_10touch passkeys.ts
Add the following code to the passkeys.ts file:
_146import { Platform } from "react-native";_146import RNBase64 from "react-native-base64";_146import { create, get } from "react-native-passkeys";_146_146const RP_NAME = "Safe Smart Account";_146const USER_DISPLAY_NAME = "Safe account";_146const USER_NAME = "safe-account";_146const DOMAIN = "add_your_domain_here";_146const CHALLENGE = "the-challenge";_146const USER_ID = "my-user-id";_146_146// This function verifies the passkey of the user._146export async function getPassKey(_146 options?: CredentialRequestOptions_146): Promise<Credential | null> {_146 // Convert the challenge to a base64 URL string._146 const challenge = bufferSourceToBase64Url(options?.publicKey?.challenge);_146 // Convert the allowCredentials to a binary string._146 const allowCredentials = options?.publicKey?.allowCredentials?.map(_146 (cred) => ({_146 type: cred.type,_146 id: getBinaryString(cred.id),_146 })_146 );_146_146 // Get the passkey of the user._146 let credential = await get({_146 rpId: DOMAIN,_146 challenge,_146 userVerification: options?.publicKey?.userVerification,_146 allowCredentials,_146 });_146_146 // Convert the passkey to a Credential object._146 if (credential?.response) {_146 credential.response.authenticatorData = base64ToArrayBuffer(_146 credential.response.authenticatorData_146 );_146 credential.response.clientDataJSON = base64ToArrayBuffer(_146 credential.response.clientDataJSON_146 );_146 credential.response.signature = base64ToArrayBuffer(_146 credential.response.signature_146 );_146 }_146_146 // Return the passkey credential._146 return credential as Credential;_146}_146_146// This function creates a new passkey for the user._146export async function createPassKey() {_146 // Convert the challenge to a base64 URL string._146 const challenge =_146 Platform.OS === "web"_146 ? crypto.getRandomValues(new Uint8Array(32))_146 : bufferToBase64URLString(utf8StringToBuffer(CHALLENGE));_146_146 // Generate a random user ID._146 const userId =_146 Platform.OS === "web"_146 ? crypto.getRandomValues(new Uint8Array(32))_146 : bufferToBase64URLString(utf8StringToBuffer(USER_ID));_146_146 // Create the passkey request JSON._146 const credentialRequestJson = {_146 pubKeyCredParams: [{ alg: -7, type: "public-key" }],_146 challenge,_146 rp: {_146 id: Platform.OS === "web" ? window.location.hostname : DOMAIN,_146 name: RP_NAME,_146 },_146 user: { displayName: USER_DISPLAY_NAME, id: userId, name: USER_NAME },_146 timeout: 60_000,_146 attestation: "none",_146 };_146_146 // Add the authenticator selection to the request JSON_146 if (Platform.OS !== "web") {_146 //@ts-expect-error authenticatorSelection is not in the official types_146 credentialRequestJson.authenticatorSelection = {_146 requireResidentKey: true,_146 };_146 }_146_146 // Create the passkey for the user using official passkeys API._146 const passkey =_146 Platform.OS === "web"_146 ? await navigator.credentials.create({_146 publicKey:_146 credentialRequestJson as unknown as PublicKeyCredentialCreationOptions,_146 })_146 : await create(credentialRequestJson as Parameters<typeof create>[0]);_146_146 return passkey;_146}_146_146/*_146* Helper functions:_146*/_146function bufferToBase64URLString(buffer: ArrayBuffer): string {_146 const bytes = new Uint8Array(buffer);_146 let str = "";_146_146 for (const charCode of bytes) {_146 str += String.fromCharCode(charCode);_146 }_146_146 const base64String = btoa(str);_146_146 return base64String.replace(/\+/g, "-").replace(/\//g, "_").replace(/=/g, "");_146}_146_146function utf8StringToBuffer(value: string): ArrayBuffer {_146 return new TextEncoder().encode(value);_146}_146_146function getBinaryString(buffer: any) {_146 const byteArray = new Uint8Array(buffer);_146 return Array.from(byteArray)_146 .map((byte) => String.fromCharCode(byte))_146 .join("");_146}_146_146function bufferSourceToBase64Url(bufferSource: any) {_146 const binaryString = getBinaryString(bufferSource);_146 const base64String = RNBase64.encode(binaryString);_146 return base64String_146 .replace(/\+/g, "-")_146 .replace(/\//g, "_")_146 .replace(/=+$/, "");_146}_146_146function base64ToArrayBuffer(base64: string) {_146 base64 = base64.replace(/-/g, "+").replace(/_/g, "/");_146 while (base64.length % 4 !== 0) {_146 base64 += "=";_146 }_146 const binaryString = atob(base64);_146 const bytes = new Uint8Array(binaryString.length);_146 for (let i = 0; i < binaryString.length; i++) {_146 bytes[i] = binaryString.charCodeAt(i);_146 }_146 return bytes.buffer;_146}_146//
We are adding 2 main functions here:
createPasskeyhelps generate a new passkey usingreact-native-passkeys.getPasskeyretrieves the passkey using thereact-native-passkeyslibrary. This method is necessary for pass to the protocol-kit init (opens in a new tab) method and will be used to sign any message or transaction.
5. Add Safe functionality
Create a safe.ts file inside the lib folder:
_10touch safe.ts
Add the following code to the safe.ts file:
_106import Safe, {_106 EthSafeMessage,_106 PasskeyArgType,_106 SigningMethod,_106} from "@safe-global/protocol-kit";_106import { waitForTransactionReceipt } from "viem/actions";_106import {_106 WalletClient,_106 Transport,_106 Chain,_106 Hex,_106 Account,_106 WaitForTransactionReceiptReturnType,_106} from "viem";_106_106export async function activateAccount(_106 protocolKit: Safe_106): Promise<WaitForTransactionReceiptReturnType<Chain>> {_106 const safeDeploymentTransaction =_106 await protocolKit.createSafeDeploymentTransaction();_106_106 const signer = (await protocolKit_106 .getSafeProvider()_106 .getExternalSigner()) as WalletClient<Transport, Chain, Account>;_106 const client = protocolKit.getSafeProvider().getExternalProvider();_106_106 if (!signer)_106 throw new Error(_106 "SafeProvider must be initialized with a signer to use this function"_106 );_106_106 const hash = await signer.sendTransaction({_106 to: safeDeploymentTransaction.to as `0x${string}`,_106 data: safeDeploymentTransaction.data as Hex,_106 value: BigInt(safeDeploymentTransaction.value),_106 account: signer.account,_106 });_106_106 const receipt = await waitForTransactionReceipt(client, { hash });_106_106 return receipt;_106}_106_106export async function addPasskeyOwner(_106 protocolKit: Safe,_106 signer: PasskeyArgType_106): Promise<WaitForTransactionReceiptReturnType<Chain>> {_106 const addOwnerTx = await protocolKit.createAddOwnerTx({_106 passkey: signer,_106 });_106 const client = protocolKit.getSafeProvider().getExternalProvider();_106 const signedAddOwnerTx = await protocolKit.signTransaction(_106 addOwnerTx,_106 SigningMethod.ETH_SIGN_106 );_106_106 const txResult = await protocolKit.executeTransaction(signedAddOwnerTx);_106_106 const receipt = await waitForTransactionReceipt(client, {_106 hash: txResult.hash as `0x${string}`,_106 });_106_106 return receipt;_106}_106_106export async function signPasskeyMessage(_106 protocolKit: Safe,_106 message: string_106): Promise<EthSafeMessage> {_106 const safeMessage = protocolKit.createMessage(message);_106_106 const signedMessage = await protocolKit.signMessage(_106 safeMessage,_106 SigningMethod.ETH_SIGN_106 );_106_106 return signedMessage;_106}_106_106export async function sendDummyPasskeyTransaction(_106 protocolKit: Safe,_106 protocolKitSigner: Safe,_106 to: string_106): Promise<WaitForTransactionReceiptReturnType<Chain>> {_106 const transaction = {_106 to,_106 value: "0",_106 data: "0x",_106 };_106 const client = protocolKit.getSafeProvider().getExternalProvider();_106_106 const safeTransaction = await protocolKitSigner.createTransaction({_106 transactions: [transaction],_106 });_106_106 const signedTransaction = await protocolKitSigner.signTransaction(_106 safeTransaction_106 );_106_106 const txResult = await protocolKit.executeTransaction(signedTransaction);_106 const receipt = await waitForTransactionReceipt(client, {_106 hash: txResult.hash as `0x${string}`,_106 });_106_106 return receipt;_106}
We are introducing four new methods to securely deploy, sign messages, and execute transactions.
activateAccountwill deploy a new Safe account on Sepolia based on the predicted configuration.addPasskeyOwneradds a new passkey owner to the Safe account.signPasskeyMessagehelps sign messages using the passkey signer.sendDummyPasskeyTransactioncreates and executes a dummy on-chain rejection transaction to test the passkey signer.
6. Add UI functionality
Using the existing App.tsx file, we will add UI components to interact with the Safe account and passkeys. Let's update the entire content and use this instead:
_339import { useEffect, useState } from "react";_339import prompt from "react-native-prompt-android";_339import Safe, { PasskeyArgType } from "@safe-global/protocol-kit";_339import {_339 View,_339 Text,_339 StyleSheet,_339 Button,_339 Platform,_339 Alert,_339 ActivityIndicator,_339 SafeAreaView,_339} from "react-native";_339import {_339 getStoredPassKey,_339 removeStoredPassKey,_339 storePassKey,_339} from "./lib/storage";_339import { createPassKey, getPassKey } from "./lib/passkeys";_339import {_339 activateAccount,_339 addPasskeyOwner,_339 sendDummyPasskeyTransaction,_339 signPasskeyMessage,_339} from "./lib/safe";_339_339const PASSKEY_NAME = "safe-owner";_339_339export default function App() {_339 const [protocolKit, setProtocolKit] = useState<Safe | null>(null);_339 const [passkeySignerProtocolKit, setPasskeySignerProtocolKit] =_339 useState<Safe | null>(null);_339 const [passkeySigner, setPasskeySigner] = useState<PasskeyArgType | null>(_339 null_339 );_339 const [safeAddress, setSafeAddress] = useState<string | null>(null);_339 const [isDeployed, setIsDeployed] = useState<boolean>(false);_339 const [isLoading, setIsLoading] = useState<boolean>(true);_339_339 useEffect(() => {_339 (async () => {_339 let protocolKitInstance = await Safe.init({_339 provider: process.env.EXPO_PUBLIC_RPC_URL as string,_339 signer: process.env.EXPO_PUBLIC_SAFE_SIGNER_PK,_339 predictedSafe: {_339 safeAccountConfig: {_339 owners: JSON.parse(process.env.EXPO_PUBLIC_SAFE_OWNERS as string),_339 threshold: 1,_339 },_339 safeDeploymentConfig: {_339 saltNonce: process.env.EXPO_PUBLIC_SAFE_SALT_NONCE,_339 },_339 },_339 });_339_339 const safeAddress = await protocolKitInstance.getAddress();_339 const isDeployed = await protocolKitInstance.isSafeDeployed();_339_339 console.log("Safe address", safeAddress);_339 console.log("Is deployed", isDeployed);_339_339 setSafeAddress(safeAddress);_339 setIsDeployed(isDeployed);_339_339 if (isDeployed) {_339 protocolKitInstance = await protocolKitInstance.connect({_339 provider: process.env.EXPO_PUBLIC_RPC_URL,_339 signer: process.env.EXPO_PUBLIC_SAFE_SIGNER_PK,_339 safeAddress: safeAddress,_339 });_339 }_339_339 setProtocolKit(protocolKitInstance);_339 setIsLoading(false);_339 })();_339 }, []);_339_339 useEffect(() => {_339 (async () => {_339 const storedPasskey = await getStoredPassKey(PASSKEY_NAME);_339_339 setPasskeySigner(storedPasskey);_339 })();_339 }, []);_339_339 useEffect(() => {_339 if (!passkeySigner || !safeAddress) return;_339_339 (async () => {_339 const passkeySignerProtocolKitInstance = await Safe.init({_339 provider: process.env.EXPO_PUBLIC_RPC_URL,_339 signer: { ...passkeySigner, getFn: getPassKey } as PasskeyArgType,_339 safeAddress,_339 });_339_339 setPasskeySignerProtocolKit(passkeySignerProtocolKitInstance);_339 })();_339 }, [safeAddress, passkeySigner]);_339_339 const handleActivateAccount = async () => {_339 if (!protocolKit || !safeAddress) return;_339_339 setIsLoading(true);_339_339 const receipt = await activateAccount(protocolKit);_339_339 if (receipt.transactionHash) {_339 setIsDeployed(true);_339_339 const updatedProtocolKitInstance = await protocolKit.connect({_339 provider: protocolKit.getSafeProvider().provider,_339 signer: protocolKit.getSafeProvider().signer,_339 safeAddress: await protocolKit.getAddress(),_339 });_339_339 setProtocolKit(updatedProtocolKitInstance);_339_339 setIsLoading(false);_339 } else {_339 setIsLoading(false);_339 }_339 };_339_339 const handleAddPasskeyOwner = async () => {_339 if (!protocolKit) {_339 return;_339 }_339_339 const passkeyCredential = await createPassKey();_339_339 if (!passkeyCredential) {_339 throw Error("Passkey creation failed: No credential was returned.");_339 }_339_339 const signer = await Safe.createPasskeySigner(passkeyCredential);_339_339 setIsLoading(true);_339_339 await addPasskeyOwner(protocolKit, signer);_339_339 await storePassKey(signer, PASSKEY_NAME);_339_339 const passkeySignerProtocolKitInstance = await Safe.init({_339 provider: process.env.EXPO_PUBLIC_RPC_URL,_339 signer: { ...signer, getFn: getPassKey } as PasskeyArgType,_339 safeAddress: safeAddress as string,_339 });_339_339 setPasskeySignerProtocolKit(passkeySignerProtocolKitInstance);_339 setPasskeySigner(signer);_339 setIsLoading(false);_339 };_339_339 const handleSignMessage = async () => {_339 if (!passkeySignerProtocolKit) return;_339_339 prompt(_339 "Sign message",_339 "Enter the message to sign",_339 [_339 {_339 text: "Cancel",_339 onPress: () => console.log("Cancel Pressed"),_339 style: "cancel",_339 },_339 {_339 text: "Sign",_339 onPress: async (message: string) => {_339 const signedMessage = await signPasskeyMessage(_339 passkeySignerProtocolKit,_339 message_339 );_339_339 if (Platform.OS === "web") {_339 window.alert(_339 (signedMessage.data as string) +_339 "\n" +_339 signedMessage.encodedSignatures()_339 );_339 } else {_339 Alert.alert(_339 signedMessage.data as string,_339 signedMessage.encodedSignatures()_339 );_339 }_339 },_339 },_339 ],_339 {_339 type: "plain-text",_339 cancelable: false,_339 defaultValue: "",_339 placeholder: "placeholder",_339 style: "shimo",_339 }_339 );_339 };_339_339 const handleSendTransaction = async () => {_339 if (!safeAddress || !protocolKit || !passkeySignerProtocolKit) return;_339_339 setIsLoading(true);_339_339 const receipt = await sendDummyPasskeyTransaction(_339 protocolKit,_339 passkeySignerProtocolKit,_339 safeAddress_339 );_339_339 setIsLoading(false);_339_339 if (receipt.transactionHash) {_339 if (Platform.OS === "web") {_339 window.alert(receipt.transactionHash);_339 } else {_339 Alert.alert("Transaction hash", receipt.transactionHash);_339 }_339 }_339 };_339_339 const handleRemovePasskey = async () => {_339 removeStoredPassKey(PASSKEY_NAME);_339 setPasskeySigner(null);_339 };_339_339 if (isLoading) {_339 return <ActivityIndicator style={styles.loadingContainer} size="large" />;_339 }_339_339 return (_339 <SafeAreaView style={styles.container}>_339 <View style={styles.titleContainer}>_339 <Text style={styles.titleText}>Safe Passkeys Demo</Text>_339 </View>_339_339 <View style={styles.sectionContainer}>_339 <Text style={styles.sectionTitle}>Safe Address</Text>_339 <Text style={styles.text}>{safeAddress}</Text>_339 </View>_339_339 {!isDeployed && (_339 <View style={styles.sectionContainer}>_339 <Text style={styles.text}>⚠️ The account is not activated yet</Text>_339 <View style={styles.button}>_339 <Button_339 color="#10e573"_339 title="Activate Account"_339 onPress={handleActivateAccount}_339 />_339 </View>_339 </View>_339 )}_339_339 {isDeployed && (_339 <>_339 {!passkeySigner && (_339 <View style={styles.button}>_339 <Button_339 color="#10e573"_339 title="Add Passkey Owner"_339 onPress={handleAddPasskeyOwner}_339 />_339 </View>_339 )}_339_339 {passkeySigner && (_339 <>_339 <View style={styles.button}>_339 <Button_339 color="#10e573"_339 title="Sign Message"_339 onPress={handleSignMessage}_339 />_339 </View>_339 <View style={styles.button}>_339 <Button_339 color="#10e573"_339 title="Send Dummy Transaction"_339 onPress={handleSendTransaction}_339 />_339 </View>_339 <View style={styles.button}>_339 <Button_339 color="#10e573"_339 title="Remove Passkey"_339 onPress={handleRemovePasskey}_339 />_339 </View>_339 </>_339 )}_339 </>_339 )}_339 </SafeAreaView>_339 );_339}_339_339const styles = StyleSheet.create({_339 container: {_339 flex: 1,_339 backgroundColor: "#000",_339 color: "#fff",_339 padding: 16,_339 },_339 titleContainer: {_339 marginBottom: 16,_339 paddingHorizontal: 16,_339 },_339 titleText: {_339 fontSize: 24,_339 fontWeight: "bold",_339 textAlign: "left",_339 marginBottom: 8,_339 color: "#12FF80",_339 },_339 sectionContainer: {_339 marginBottom: 16,_339 paddingHorizontal: 16,_339 },_339 sectionTitle: {_339 fontSize: 18,_339 fontWeight: "600",_339 marginBottom: 4,_339 color: "#fff",_339 },_339 text: {_339 fontSize: 16,_339 textAlign: "left",_339 marginBottom: 8,_339 color: "#fff",_339 },_339 button: {_339 marginVertical: 8,_339 paddingHorizontal: 16,_339 },_339 loadingContainer: {_339 flex: 1,_339 justifyContent: "center",_339 },_339});
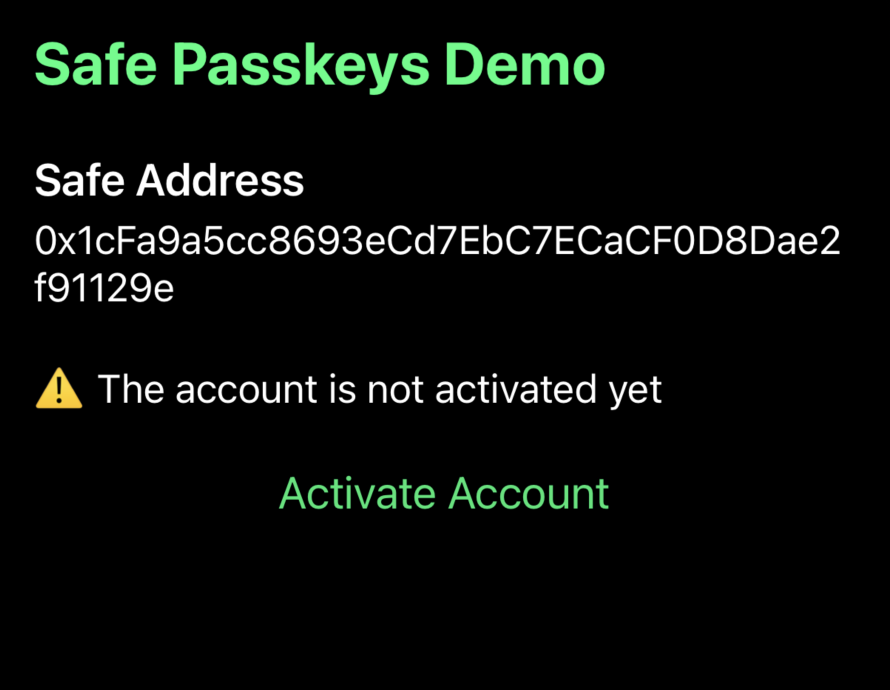
Now we should have a functional app that enables users to activate their Safe account and interact with passkeys.

7. Setup emulator specific registration files
To use passkeys in the app, you need to complete some additional setup in the Android and iOS projects. To facilitate this, we are providing a simple Node Express web server (opens in a new tab) for testing.
Clone and install the repository with:
_10git clone https://github.com/5afe/aasa-server.git
- Login or subscribe to the Apple Developer Program and locate your Team ID (opens in a new tab).
- In the
apple-app-site-associationfile in the AASA server, add your Team ID instead ofadd_your_apple_team_id_here, and a bundle identifier (following this conventioncom.<your_team_name>.<your_app_name>) instead ofadd_your_package_name_here. - Activate FaceId. Go to Features > Face ID > Enrolled in the iOS simulator menu.
Fill in your data in the apple-app-site-association (if you are using iOS) or assetlinks.json (if using android) files as explained above. You can now start the server with:
_10cd aasa-server_10npm install_10npm start
Once you have it running, you need a public domain secured with SSL to test the passkeys (localhost is not valid). You can use a service like ngrok (opens in a new tab) to create a tunnel to your local server.
After the installation, create a tunnel to the localhost port you are using, which should be 3000 if you are using the provided server.
_10ngrok http 3000
The ngrok service will provide you with a public domain. You must copy this domain (without https://) and add it to passkeys.ts (opens in a new tab) (line 8).
Replace your project's app.json with the following:
_47{_47 "expo": {_47 "name": "react-native-passkeys",_47 "slug": "react-native-passkeys",_47 "version": "1.0.0",_47 "orientation": "portrait",_47 "icon": "./assets/icon.png",_47 "userInterfaceStyle": "light",_47 "newArchEnabled": true,_47 "splash": {_47 "image": "./assets/splash-icon.png",_47 "resizeMode": "contain",_47 "backgroundColor": "#ffffff"_47 },_47 "ios": {_47 "supportsTablet": true,_47 "bundleIdentifier": "com.<your_organization>.<your_app_name>",_47 "associatedDomains": [_47 "webcredentials:add_your_ngrok_domain_here?mode=developer"_47 ],_47 "appleTeamId": "your_apple_team_id"_47 },_47 "android": {_47 "adaptiveIcon": {_47 "foregroundImage": "./assets/adaptive-icon.png",_47 "backgroundColor": "#ffffff"_47 },_47 "package": "com.<your_organization>.<your_app_name>"_47 },_47 "web": {_47 "favicon": "./assets/favicon.png"_47 },_47 "plugins": [_47 [_47 "expo-build-properties",_47 {_47 "ios": {_47 "deploymentTarget": "15.1"_47 },_47 "android": {_47 "compileSdkVersion": 34_47 }_47 }_47 ]_47 ]_47 }_47}
In the associatedDomains array, replace add_your_ngrok_domain_here with your public ngrok domain; replace your_apple_team_id_here with your Apple Developer Program Team ID; lastly replace the two occurrences of com.<your_organization>.<your_app_name> with your app's package name (it must be the same than the one in the apple-app-site-association or assetlinks.json file).
Delete the /ios and /android folders and restart the app (npx expo run:ios or npx expo run:android) to apply the changes.
8. See the App in action

Do more with passkeys
We learned how to use passkeys (create them, store them, and use them securely) and how they can interact with a Safe (deploy it and send transactions). We hope you enjoyed this tutorial and that the combination of passkeys and the ERC-4337 will unlock new forms of ownership for your project and users.
You can now integrate passkeys with more transactions and functionalities of the Safe ecosystem. You can read more about passkeys in the overview page or in the WebAuthn API documentation (opens in a new tab).
Did you encounter any difficulties? Let us know by opening an issue (opens in a new tab) or asking a question on Stack Exchange (opens in a new tab) with the safe-core tag.